skip to main |
skip to sidebar
 This image was taken by Chuck Kennedy, also a profesional photographer, from Amory, Mississippi. This is a very warm picture compared to the previous picture because it is using natural light, during dawn. I like the effect this gives because their body looks a lot warmer, showing that it is summer. I also like how the sea is in the background and there are a couple of buildings in the background as well because they also show the strength of the sun light.
 This image was taken by Michael Fineman, a profesional photographer from Miami, Florida. I like the way he has taken this picture, because of the use of lighting. This light, different from the previous image, is artificial light. It is obvious because it gives him a whiter color, instead of giving a warmer color. The use of lightin in this image though is interesting because of the effects it makes. Especially on the black jacket he is wearing, you can very clearly see the detailed outline of where the jacket folds. It is also nice because of the great amount of light focused on the left side of the singer's face, yet the darkness of his right side of his face.
 This image was taken by Mark Robert Halper, born in 1965 in San Francisco, California. He is living in Los Angeles, as a photographer, and is known for his striking human images in his commercial and fine art photography. He has worked with portraits, lifestyles, celebrities, architecture, still life, and fine art. The image on the left shows one of his images with architecture. I chose this image because of the use of lighting. This picture was most likely taken early in the morning since the light is coming from low, and it is a natural light. I like it because is shows clear shadows of the trees, but also because on the edge of the building you are clearly able to see where the sun is illuminating and where it is not, and the difference in lighting.

 The dress on the left is what I had chosen for the fashion of clothing. This picture turned out relatively bad lighting because it wasn't natural light. I used artificial light while taking this picture because it was late at night, and there was not enough light from outside to capture it. That is why you can see that there is a lot of light at the top of the picture, but a lot less at the bottom of the picture, so the detail is lower where it is darker. But because the picture was taken this way, i couldn't do anything about it. The print on the left shows an aperture of 2.8, with filter 2, at 16 seconds. This was also the first print in which i used a filter because it was too grey. The test strip on the right also shows how grey it looked. When i did my larger print, like i said before, i had to add a lot of time in order to get rid of the greyness. The teststrip also shows the difference is the use of grey at the lowest time in comparison to the highest time. The lowest time is at the bottom of the dress, starting at 30 seconds, going up in two's up to and including 36. Since 36 seconds was the best, my final large print was at 36 seconds, 2.8 aperture, and it had no filter.

 For accessories, i used three cellphones and one watch. The watch is hidden in the back. I find this a nice picture because of the use of three different phones and the use of focus. I like that the only thing that is truly in focus is the black phone under the other phones. Because it gives more empahsis on the detail of that phone as opposed to the other phones. This image was easy to print when I was still printing it on small paper, because it didn't look too grey as you can see on the left. The settings for this image is aperture 2.8, filter 0 and 10 seconds. But when I started working on my bigger print, like you can see on the test strip on the right, i simply increased the time to twice as much. But the picture turned out too grey. So i had to start increasing time, and eventually, the final print was at 26 seconds, without a filter and at aperture 2.8. The final print has a use of color like the smaller print does on the left, so it doesn't look very grey like the test strip does.
 This print was complicated to get it's exact point because of the intense use of shadows and lighting. This image had a significant boundary. The final small print was printed at 2.5 seconds. But when i tried it at 2 seconds, i could see he grey coming in the shoe which is black. But as i put it to 3 seconds, you couldn't distinguish between the shoe and the shadow. Therefore, this was the right timing. While printing this, i realized that i don't only need to think about focusing the image properly, or the position of the subject, but i realized that I need to be careful with the setting. As you can see on the back of the image there is a wire coming through. This is rather disturbing in an image like this. So I know that for next projects and prints i need to look at the image as a whole, not just the subject. As i said before, this image was taken at 2.5 seconds, the aperture was 2.8, and it had no filter. But our final print had to be on a large print. So i had to put the station higher to make the print higher too. This means that i also had to increase the time I was putting the paper in sunlight. The reason for this is because distance looses part of the light, so the higher the light source is, the more time you need. But when i doubled the time, from 2.5 to 5 seconds, i saw that it was still not enough time. Which must mean that I enlarged the image more than twice the size. My final print ended up being at 8 seconds, with an aperture 2.8 and no filter.

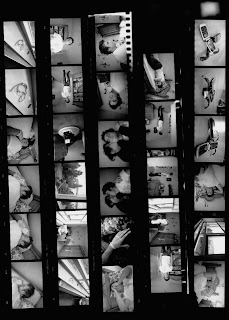 For this project, i only needed to making printing compositions for two of my prints because I had taken my picture of the shoots before during a different project. The printing composition of that print is also on the last blog made for last project, but below it is shown again, at an aperture of 2.8, filter 0, and 2 seconds, this printing composition is shown on the right. The second printing composition you can see on the top left. Some of the images taken for that film were related to clothing, and others were related to accessories. But of this composition i ended up using only the cell phones with the watch witch was an accessory. The composition has a good use of contrast, and it is very clear. Howeve
 r some pictures are not well in focus. But it was an easy and fast process to find it's settings, which were at an aperture of 2.8 filter 0 and 8 seconds. Which is similar to the first printing composition, except for the timing, which usually depends upon how new the chemicals are that are being used.On the right, we can see the final printing composition i made for the clothing section of this project. This composition has a worst use of contrast, as we can see it's a lot darker in comparison to the other compositions, however the detail remains good. This composition was taken at a higher filter because without the filter the composition looked too grey. This composition is at aperture 2.8, filter 2, and 11 seconds.
Sunlight ShootingWhen shooting in direct sunlight, the images can end with a too high contrast, blown out highlights, lens flares, and colors that look overly saturated. There are several ways to prevent this from happening: - Move into the shade- this is usually the best while making portraits to have the subject in the spotlight, but not insert too much light into the camera.
- Make your own shade: When you are unable to move the subject, use your own shadow, or someone elses shadow, or use a different object to make a shadow.
- Use fill in Flash: therefore you give lighting to the shadows the image creates
- Use a reflector: such as a mirror to reflect back some light to the subject which is good for allowing shooting into the sun.
- Change your perspective: changing your own position may be handy to avoid direct contact with the sun.
- Use a lens hood: You can also simply use your hand, to cover your camera a little bit from the sun.
- Filters: They will cut down the light getting into your camera, and the polarizing filter cuts down the reflections.
- Pick the time of the day to shoot: Dawn and dusk are the best times to shoot since the light is not as strong as the light coming during the day from above the head.
Low-Light Shooting: Unexperienced photographers often use their flash directly when they see that there will not be enough lighting in the image without the extra support. To create a greater sense of lighting, this is very effective. However there are other techniques to make a good potograh.
- Fast film:
When using a traditional camera, you are recording light on the film. While processing the film, the image starts coming out on the negative, having formed a picture. The use of speed of the film is very important, because the lighting in the area you are shooting needs a different care than in a different area. When the conditions are dim, you want to shoot with a high speed (ISO 800). If you want to get a large amount of what is in the picture in focu, you need to close the apreture. This picture will usually take longer to shoot because it needs more time to absorb the light. Therefore it would be handy to use a tripod while taking that kind of pictures.
Taking low-light shoots falls into two categories: natural light, and artificial light.
-Natural Light: In color print film, photographers are nowadays using ISO 800 films which give them better results than the ISO 400 they used several years ago, because their images are sharper, have a better contrast, and have brighter colors.
- Fast Lens:

Fast lenses are usually of apreture 1.4, 1.8, or 2.8, which allow the more light into the camera then slower lenses do. When the light lever reaches the film increases, the shutter speed at which you can shoot also increases. Reducing the chance of a moving, or blurry pictures.
- Fill Flash:
It is usually better for the image to while shooting with a flash light, to reduce the intensity of the flash, which is possible in camera accesaries sold now. The image on the right uses fill flash.
As we use the dark room more, we start to get more experienced with it. However I keep learning new things every time. While working on this project, I have had to use a filter for my last print: the prom dress. Without the filter it was too grey. Last school year, while I was still a beginner, my ability to make good photography’s was not very skilled.  Therefore, I had to use filters often because my picture would not have enough contrast. However, that filter was different to the one I am using on my new station. Last year the filter had one wheel, but this year, it has 2 wheels. Using yellow and pink to change the filter. Depending on the combination, there will be a higher filter or a lower filter. So during this last project, I learned how to use a different kind of filter.


